Wednesday, November 27, 2013

Super Flaky Pastry from Italy, yumm.

The baking challenge for this month turned into an even greater challenge than I realized! We were to choose to make homemade ricotta cheese or candied orange peel, to make a dough, and then finally to attempt to make Sfogliatelle Riccia, Sfogliatelle Frolla, or American inspired Lobster Tails. My initial plan was to make the ricotta then to make the Riccia dough, however I had a small, water issue, my kitchen flooded on the day I had planned to make the dough. By flooding I mean, about an inch to an inch and a half, of water that was standing in my kitchen, from our ice maker in our freezer that broke. We had a cleaning crew that had a large number of fans blowing air around our home attempting to dry out, our floor, kitchen floor, cabinetry, and walls; however none of this before my sweet husband attempted to extract the water from the floor.


Now the other thing that should be noted is that I had 15 air movers, a dehumidifier, and my appliances were pulled out from their assigned spaces.


This made for a miserable few days, fortunately, the flood occurred on Thursday, and we were moving our appliances back in on the next Tuesday night. I will add however that the floor, cabinetry, many baseboards, and doors still need to be replaced so my kitchen counters are still a wreck.

On to the Challenge:

Blog-checking lines: Sandie of the lovely blog, Crumbs of Love, was our November hostess. Sandie challenged us to make a traditional Italian dessert, along with it's American version - Sfogliatelle (or better known in the US -lobster tails!) The flakey, 1000 layers of super thin dough, shaped into a horn and filled with a scrumptious filling. Cosi buono!

I ended up making the ricotta two times, and I was thoroughly surprised at how easy and delicious it was! After the first attempt as I did not want to throw it all out I made a crockpot penne pasta which was much like a layered lasagna. It was very tasty and rich, not to mention, the hubs loved it! So once my kitchen was back together to a certain extent, I decided I was going to give this challenge another attempt, and I made more Ricotta.

Milk and Cream awaiting boiling.


Ricotta after sitting in the cheese cloth for a few hours.


The second round of Ricotta did not make as much as the first batch, so I am not sure if I had an issue with the cream, boiled the milk too long, or if my ingredients were not fresh enough as I was using the dairy just before expiration dates, and the lemons I had for a while.
 
The next step was to make the dough and let it sit over night in the fridge, the dough was gorgeous! I would love to find multiple uses for the dough it was so pretty! Once my dough had time to sit overnight, it was time to tackle the rolling it out to an incredibly thin sheet. I was able to use my pasta hand crank dough roller and had a bit of trial and error but came up with a way to roll thin batches, stretching small sections, and then layering them together, rolling the log up with the shortening and butter mixture.
 
This is my dining room table being utilized for the rolling of the dough.

The thinly stretched dough with the shortening and butter mixture.

Here is the dough in the process of being rolled into the log before cutting.
 
 
I was so proud of my ability to get the dough so thin and the fact that I was able to use my pasta roller made me thrilled!!!! I was so fortunate that I had the pasta roller, and am just so impressed by the bloggers who had to utilize their hand rolling skills only.
 
 
After the dough is rolled up it sits in the fridge for a few hours to solidify the shortening and butter. Then you get to cut the slices. I was amazed to see how you really could see the layers of each cut piece.
 
This photo is a bit bright, and does not do the layers much justice, but you can see them a little bit.
 
This one is a little better, which I took with my phone.
 
 
The next step is to push the little layers our much like a collapsing cup so there is space for the filling. The filling is a semolina, homemade ricotta, and traditionally candied orange peel, I opted for candied cherries, as one of the other bloggers utilized that combination, and I was pleased to follow that bloggers lead. Here are the photos of my filling.
 
First the semolina after it had been cooked and chilled, much like a chilled polenta.

Ricotta and semolina just before mixing.

Mixture with the cherries added to it.
 
The final step was to fill the pastry and then bake it. The filling was a very thick filling, and when I initially tried to put it in a zip lock bag and use that to fill the pastry the bag split in several places. Once I located my pastry bags though I was ready to fill and bake!


These turned out so wonderful. I enjoyed eating a few with my husband at home, and took the remainder to work.
 
Don't they look wonderful!


The crunch was amazing, you see my little Gigi in the background listening while tilting her head at the crunch.
 
 
When I say there is an amazing crunch, I am not kidding, I had to call a few folks just to share how crunchy it was. Such a decadent treat, and one I had to share with work. 
 
I had so much of the  filling left over that I decided to try the Frolla as it would be relatively easy to do on a day that I had to work as well as getting pre-work sleep. Everyone at work loved the efforts of both type of Sfogliatelle.
 
Thank you so much Emma! She is enjoying the Frolla type.
 
This challenge was so fun, and I had grand ideas of making more with my mom to enjoy with our Thanksgiving meal, however due to illness, the dread allergy cold, we opted to pass on this as it is a lot of work. I plan though to make these again in the future, maybe come up with an idea to make a savory filling, utilizing polenta, cheese, and something else. I hope you enjoyed reading and thanks for stopping by! 


Thursday, November 21, 2013

Drowning in the possibilities, a Soup disaster.


Sopa Castellana an interesting Spanish Soup, that I was beyond excited to try to make. It has been chilly some in the evenings here in the Austin area and I thought soup would be a great thing to make one night and went for it. I ran to the grocery, the special grocery and got the necissary ingredients, though I will say I did not purchase veal bones, I purchased a shank along with a shank of beef; this was a cost prohibitive soup, the veal was expensive, regardless I did the best with what I had an gave it a go.


Blog-checking lines: Our November Daring Cooks’ hostess was Begoña, who writes the beautiful blog, Las recetas de Marichu y las mías. Begoña is from Spain and didn’t want to go with the more common challenges of paella or gazpacho, she wanted to share with us another very popular recipe from Spain that we don’t see as often called Sopa Castellana which is a delicious bread soup!


So what's a girl to do. I had the recipe and was ready to go, I should say this was my first time making beef stock from scratch. I often use a boxed stock, my go to is the Kitchen basics, but I though I would give it a go. I mean it is boiling meat, bones, vegetables, and water for a lengthy amount of time, skimming of the gunk and then you should have liquid gold right? Wrong! My stock was terrible, it tasted more like vegetable water with only the flavor of the vegetables coming through, celery to be exact. I was so disappointed but kept on going thinking maybe I was just overly picky and used to salty stock since I use store bought so often. On to the soup.


I had the Serrano Ham, the garlic, and the bread all ready to go and it was cooking away in the pot, boy were my expectations high. Once that was ready I added the stock, which from here on out shall be called vegetable water, and gently simmered the soup with such high hopes. Once it had simmered it's required amount of time, I pulled my soup crocks out which I use almost exclusively for my French Onion Soup, and began ladling in the soup over some bread that I had in the bowl. Then I added the egg, one to each bowl as it was just the hubs and me; and waited for the temperature of the soup to do it's thing, apprehensively so, as I am a stickler about cooked eggs.


Needless to say that nights dinner ended up being Whataburger for us. My soup never recovered from being just vegetable water. Additionally between the Serrano Ham and the olive oil it was like a giant oil slick on the top. I contemplated trying one of the other options available to us from the hostess, but decided against it. I may try one of the others in the future but it will not be any time soon.


So what went wrong with the vegetable water? I did a bit of research and I can only come up with a few options. The first I used too much meat and not enough bone. According to what I have found you really need several pounds of bones, preferably roasted and if they are big marrow bones they should be cracked a bit. The next place I went wrong is once the bones are in the water according to the research I have done they cook for hours, I am not talking the two or three hours suggested in the recipe I had, but 17hours- 2 or 3 days, this is so not happening in my house. Then the other things I read were regarding the vegetables that are added, many said to be cautious about the amount of celery you add, as it can overpower, I am going to guess that means not the whole bunch like I added. Additionally my research informed me that chicken stock is more manageable then beef or veal stock. Regardless the most important thing in this whole experience was that I enjoyed the process, if I am not enjoying the process then it is not worth it to me, if I am at least enjoying the process then while the meal was not a success the experience was. So now onto the photos...


The meat, pre vegetable water status.
 
Here is the soup waiting for the egg to cook.
 
Here is the soup when it is "ready." Ashley and I both tasted it, we were both disappointed.
 
 
I have other photos to share, but at this moment I am not certain where my camera is as our kitchen flooded following the preparation of this dish, and things got moved around haphazardly; should I find it I will add more later. I will finish with this last thought, even if it is a disaster it is important to try making and eating new things, there are always other options around the corner if it is a failure. Happy Cooking. 

Monday, May 27, 2013

Some days you should bust out your tiara and enjoy some princess cake!

This month's baking challenge was all about a special treat, one that made me feel as if I should be in a pastry shop!

Blog-checking lines: Korena of Korena in the
Kitchen was our May Daring Bakers’ host and she
delighted us with this beautiful Swedish
Prinsesstårta!


This challenge the princesstarta was one initially I though I might not be able to do as I have had so many things going on this month with helping my mom prepare for a party and getting ready for a much needed vacation. Last week though I decided I had some time and I must approach this head on. If you are interested in trying your hand at this delicate pastry or reading up on it, please follow this link.

Now on with the show!

 
This is the batter waiting to bake, I have to say I made this cake two times as the first one I slightly burned. The second time though it came out perfect!


This is maybe one of the best vanilla custards I have ever made and I can see this making an appearance else where!


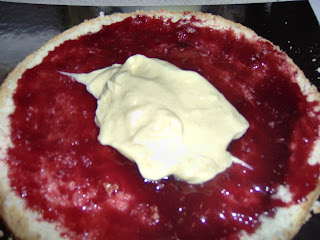
Cake after it has been sliced and covered in raspberry jam and starting the covering of pastry cream.

The lighting is a bit rough but that is my cake with it's mound of whipped cream.

 
My cake with it's crumb coat of whipped cream.

 
I rolled and rolled and rerolled my marzipan, which I made from scratch. I was so pleased with this experience I cannot wait for another reason to make this cake.

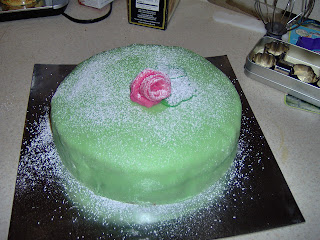
Close up of the rose which I rolled myself. I am really proud of this cake!


Just a little mini collage of the cake.
 
Close up shot of the layers.


The perfect slice, Ashley and I shared this one.  


Two of my brave co-workers enjoying a bite. Thanks Guys!
 
 
All in all this was an amazing experience. Ashley was not too crazy about the cake but I was not surprised he likes his chocolate! The cake though was a huge success at work. Many people were able to enjoy it! I loved sharing it with my work family, even if one of my good friends had some palpitations following eating it! I hope that you will consider giving this a try, because while it may look difficult it was pretty manageable and the end result is worth every minute. Such an amazing challenge! 

Thursday, April 18, 2013

So excited but so late now!


So I have been missing for a while with my DaringKitchen Challenge, but this month I did complete the Daring Cooks Challenge, and it was amazing!

It was a challenge to challenge for sure! I was super nervous about it in the beginning but quickly found it to be fun and exiting, as cooking challenges go.

Blog-checking lines: For the April Daring Cooks Challenge, Lisa from Parsley, Sage and Sweet has challenged us to debone a whole chicken, using this video by Jacques Pepin as our guide; then stuff it, tie it and roast it, to create a Chicken Ballotine.

We deboned a whole chicken. I was so fortunate while at the grocery getting the chicken my store had two nice sized chickens for just under 10 dollars which I felt was a steal and if I "butchered" the first one I always had the second one to fall back on. I watched the Jacque Pepin video probably 15 times before I felt confident to give it a go. I also have to add that while I have some nice knives I really thought I should get a new one, so I took my gift card that was a gift at Christmas from my friend Annie to Sur Le Table and started shopping for a new knife. I knew after watching Jacque all I really needed was a good sturdy quality blade that could be easily managed. It was so fun shopping for the knife and I got the professionals discount because the sales clerk was impressed by my intended plan for the knife and stated if you are tackling that you surely deserve the professional discount! Anyway enough about the knife; we are here to debone a chicken. I looked at the bird and was a bit anxious at first but as things go I was not about to "chicken" out.. Sorry I could not resist.

Anyway here is the work on the chicken.


 I will not be over come with fear. The new knife is on the left.

 This really seems like a big chicken.

 Off with the wings.


Jacque does this thing where he makes chicken lolly pops, I totally messed mine up.  


Cutting down the back of the bird.

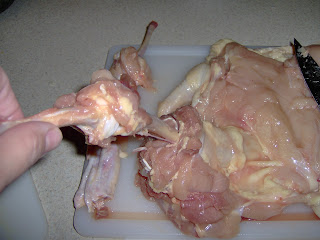
Out comes the leg bone.
 

Fully boned out bird, see how nicely the body over laps itself. 


Now to season and stuff the bird.

I had grand plans for the stuffing, I had decided to just "wing" it. Okay I will do my best to layoff the puns.. Anyway so I thought I would do a cranberry, leek, stuffing with goat cheese and walnuts. I was so thrilled once I was done with the deboning that I completely left out the goat cheese and the walnuts.

Here are the ingredients to my stuffing though, and I am sorry to say I have no measurements other than my hand and eyeballing. 8 ounces of day old Italian bread cubed into about 1/2 inch cubes, a hand full of dried cranberries boiled in about 3/4 cup of water for 10 minutes to reconstitute, 1 leek halved and sliced into half coins, one onion diced, both are sauteed in a bit of olive oil and butter; add every thing together in a bowl then throw in your favorite seasonings; I used salt and pepper along with some lemon rosemary and dried orange zest that I had on hand. You stuffing will look like this.

Leek and onion cooking.

Yes those are ice cubes you see in the stuffing as I did not plan well enough and had to cool it down before putting it in the bird below.


Here is the stuffed bird before trussing. 

Finally the trussed bird in a roasting pan, seasoned with some salt, pepper, and butter. The trussing I think really was the most difficult part. I placed it on some onions to roast.
 
 
Into the oven that bird went for around an hour or so, I checked the internal temp of the stuffing to ensure a full 165 degrees and then took it out. It looked nice, I would have liked a bit more color though on the skin.
 
It smelled like heaven.


I loved how easy it was to slice this and it was still beautiful.


Some close ups of the stuffing. It was so moist and tasty.
 
 
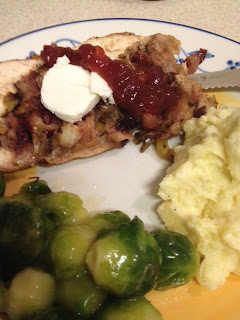
So after cooking and remembering that I had left out the goat cheese as well as the walnuts I was a bit disappointed, however I have pretty flexible when it comes to cooking so I did some mashed goat cheese potatoes and placed a slice of goat cheese on top of the slices of chicken. I did not make a sauce and instead used a cranberry orange chutney from the local grocery store which was the perfect addition.
 

Some close ups of the final product on the plate.


So Ashley loved it, the leftovers were better than the first time around. I also took some to work to share with folks and several people were glad to get to taste the end result. Now I have that second bird still left to do something with. Ash had requested that I do something like his favorite dish that I make which has a small chicken picatta similarity. I am still playing with the ideas in my head, but when it is done I will follow up with an additional post. I hope that you enjoyed the photos and that you take some time to watch Jacque Pepin complete the task of deboning a chicken. Happy Cooking to you.