I have not written in a long time. I think I lost my momentum and then The Daring Kitchen went away. It broke my heart, and truly I have not challenged myself to bake anything significant since then. I have however started to develop a desire to bake recently. I want to bake amazing pastries and baked good. The most recent thing I baked was my husbands Oreo Cupcakes for his birthday mid month in August. I was not super impressed with them, but he enjoyed them.
Hubs and I have purchased an RV recently and have gotten to spend a few weekends out of town and in the RV. I have not yet done a lot of cooking in the RV, one due to the amount of time we have to spend in the RV and two I am still trying to figure out how to make it all work. I did try to bake some ready made cookies in the RV, I had my pizza stone in the oven, as so many have suggested to help ensure even heating in the oven, but I left my cookie pan at home, so opted to bake directly on the pizza stone. That worked well, however I did not think through the porous nature of the stone so when I went to cook in the oven again I ended up smoking us out of the RV. Not really, but it was pretty rough and all the windows were open. It was a good laugh for us, and I am sure anyone within smelling distance of our camper thought I was trying to burn the place down. We took the stone home to try and heat it more fully, and realized after looking at the bottom of the stone it appeared that there had possibly been flames. Truly I am not sure about baking in the RV, it may be a challenge.
As for the rest of my life, I am working a "normal" scheduled now that has me out of the house five days a week, this has also impacted my cooking/baking abilities, because I don't have as much free time as I once had.
I have been doing a lot of cooking though, and am following the Weight Watchers Freestyle plan, having re-joined Weight Watchers. Let me start by saying I LOVE Freestyle. I have lost a little over 50 pounds so far, and have another 50 or so to go. I can do it, as long as I stay away from the snacks. One of my favorite blogs is the Skinnytaste.com blog. She is amazing! The woman who runs that site comes up with some of the most amazing recipes I could find, for those of us who are trying to watch our weight. I have tried so many, and purchased her cook books. I almost always adjust the garlic or seasoning, but that is a personal preference.
Additionally if you have never heard of Recipe Archeology, go and check their YouTube channel out. They are amazing...
Now that I am all caught up, it's time to decide the next cooking adventure. Maybe this time I will keep stay focused.
Thursday, August 30, 2018
Friday, November 28, 2014
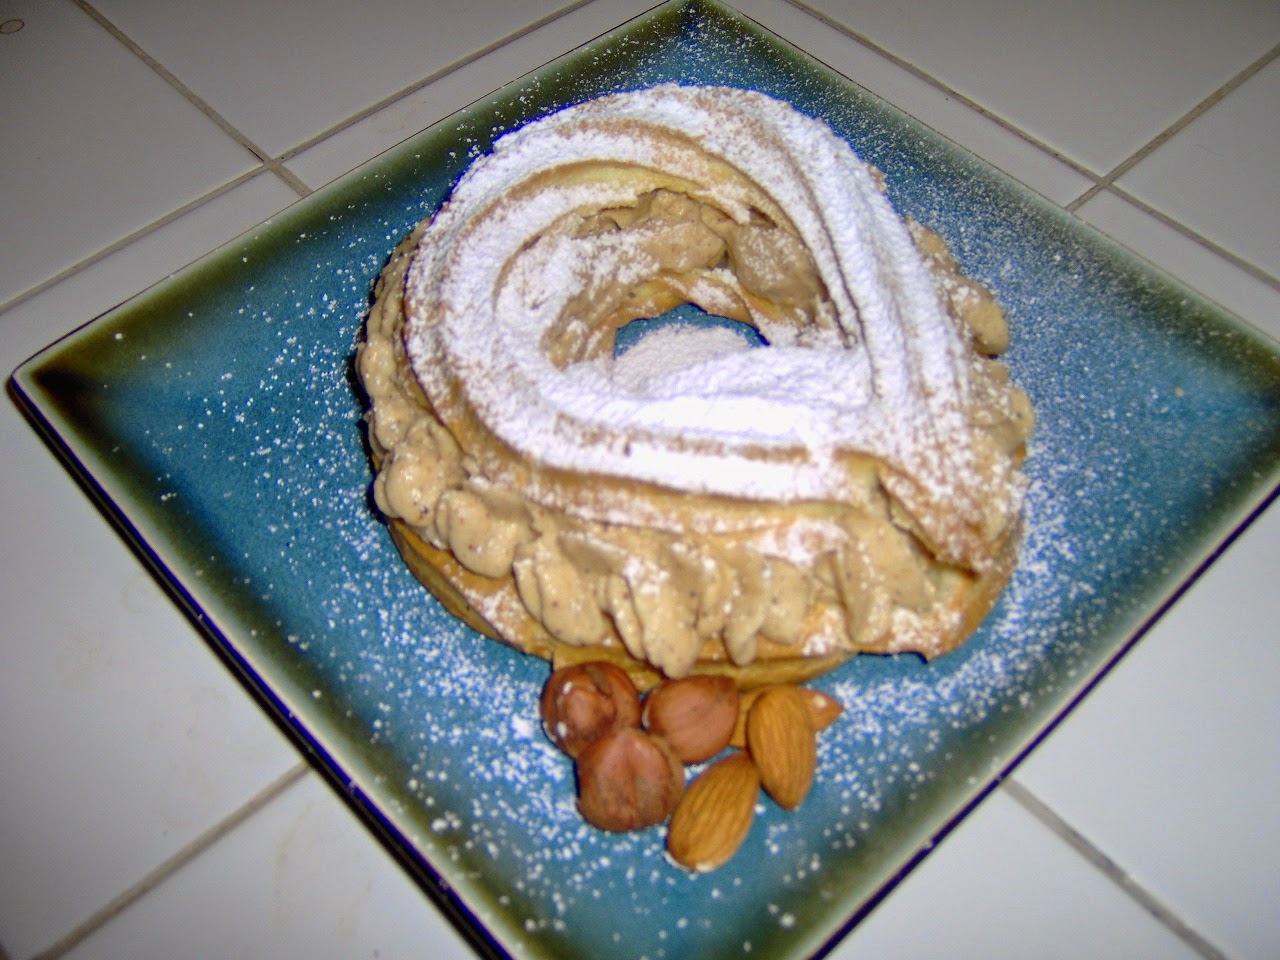
Keeping abreast with Paris Brest
So this month The Daring Kitchen once again took me to my favorite culinary culture, and that is to France. This month's baking challenge was called Paris Brest. Now I have done a bit of research on this as it was on my to cook list, and I have several recipes stashed away but I opted to use the one provided to us as it is a proven recipe.
Blog Check-in Lines: The November Daring Baker's challenge took us for a ride! Luisa from Rise of the Sourdough Preacher challenged us to make a Paris-Brest, a beautiful pastry celebrating the Paris-Brest Bicycle race.
What I found in this challenge is that my piping skills still need a touch of work, though I did make round circles, which is important since the pastry should represent a bike wheel. According to Wikipedia Paris Breast has been around for over 100 years, and it has taken me about 40 to try it for the first time, I don't remember having one while in Paris either time I have been there, and I am kicking myself for that. You can follow the link on the Wikipedia if you would like to learn more about the history.
Paris Brest is a choux pastry that is piped into circles, baked until done, and once cooled filled with an amazing pastry cream, vanilla, chocolate, or praline (which is what I did). The praline cream was amazing, it is an almond and hazelnut praline, which was a bit of a challenge as I could not find shelled hazelnuts, so you guessed it, I bought ones that I had to shell myself, it was a site. I was trying to break the shells with my meat mallet as I don't have a nut cracker, and trying to keep them in the towel on a counter, and keeping them away from the dogs when they shot out. I got it done, but it was a bit of work. Once the nuts were shelled it was on to make the praline which at first gave me a fight, I really have not done a whole lot of work with sugar and cooking it to melting, but I stayed with it and got the most wonderful nut praline, and then a praline paste, this stuff is amazing! Like peanut butter (which I am allergic too and will eat anyway) but way better, and probably won't cause me to have hives.
Once I was done with all the pralines I made the choux pastry, piped it and baked it; TWICE, because yours truly did not get it cooked all the way through the first time, and I had some serious collapsing. After the first collapse, I put the pastry back in the oven for a second go, and they puffed up a bit, not as much as I would have liked, but enough.
While the pastry cooked I made the pastry cream, I have several recipes and am always open to try new ones, this cream was a bit denser than some of the other ones I have done, but still wonderful. Once it was cooled and just before time to start putting the pastry together it was time to add the praline paste to the pastry cream, can you say heaven in a spoon!
The final steps to the beautiful pastry was to pipe the pastry cream into the shells and the results were no less than amazing! Hope you will enjoy taking a look at the photos.
This is the one that Ashley and I had together.
Yup, those are the fresh hazelnuts.
All the nuts for the praline.
Sugar and water mixture ready for the caramelizing process.
Have added the nuts here, and the sugar seized up, I had to read up to know that would happen.
Sweet caramel gold.
Laid out to cool.
All cool and ready to become the next step.
This stuff is amazing.
Pàte à Choux cooking on the stove.
Choux paste with egg.
As I said my piping is a bit in need of practice.
The goal was to do two rings on the bottom, one inside one outside, then to top it with another ring. That was the attempt at least.
And this is the final result.
And just before we dig into the pastry!
This was such an amazing challenge, and I am so glad to have completed this. Now to see what comes next. I think I have found my new favorite dessert until the next one.
Friday, November 21, 2014
What is going on in the kithen... The Daring Kitchen that is...
So I have come to share that the Darin Kitchen has been in a bit of flux lately. There have been some changes in leadership though for no other reason then it was time to pass the torch. I have been somewhat a member in hiding for some time, and have not ever been really active. I have however attempted to do many of the challenges that were posted. It had been so long since I posted prior to posting the lovely Sachertorte that I realize I had missed many wonderful challenges, though not for lack of trying; I have the Korean chili paste for bibimbap and I have bulgar for maftoul. I have grand plans still that both of those recipes will be making it into our home before long!
So for the months of November and December as we had not host or hostess to provide us with a lovely challenge, the challenge was to do some of the dishes that had not been done, or had been "missed" for what ever reason, here is the link to the archived recipes, here.. I chose to start off with some dishes that I could actually get done as I have started a new job and the training week was going to be rough and leave me with little to no time off at all. My choices in the challenge for November to December have so far been the following things, some pâté and some cheese.
Blog Check in lines:
Our hostesses this month, Evelyne of Cheap Ethnic Eatz, and Valerie of a The Chocolate Bunny, chose delicious pate with freshly baked bread as their June Daring Cook’s challenge! They’ve provided us with 4 different pate recipes to choose from and are allowing us to go wild with our homemade bread choice.
Sawsan from chef in disguise was our March 2013 Daring Cooks hostess! Sawsan challenges us to make our own homemade cheeses! She gave us a variety of choices to make, all of them easily accomplished and delicious!
So I modified the challenges a bit to meet my time needs, and I did two of the Pâtés and one cheese so far; let me say though that they were all delicious!
For the pâté I chose the tricolor vegetable pâté and I also did the shrimp and trout pâté.
The first set of photos are of the tricolor vegetable pâté.

White Bean Puree

Roasted bell peppers

Roasted bell peppers with ricotta (WHICH WAS WRONG!!)

Hence the reason it looks as if I have scraped something off, I did, I had to take of the wrong bell pepper mixture!

Now it's right, bell pepper and feta.

The beginning of a beautiful pesto!

This pesto smelled so wonderful!

Pesto with the Ricotta, yes that is supposed to be what the ricotta was mixed with.

Now to let it sit in the fridge for a few hours.

The un-molding, frankly I am surprised it worked!

You can see all the layers, though the red is not as dark as I would like.

But it was so yummy, I served it with some thin crackers..
The next to attempt was the Shrimp pâté.

I was lucky that I remembered that I had gulf shrimp in my freezer.

This is some steel head trout, I was not sure what to use, steel head or rainbow, and this was the suggestion was from the fish market.

Getting ready for some serious blending.

OK, Let me say I was so excited to flambé and it was a success, just wish I had photos to show.

Here are the little decorative shrimp getting ready to have a firey time.

Flambé nope, you can't tell...

Shrimp pâté ready to bake.

Final Product with it's decorative shrimp on the top.

Nice cut view, you can see the shrimp that I layered peeking out...
So about these pâtés I was able to take some to my new job, and I think the new co-workers are thrilled to learn that by me saying I cook, I don't just mean blue box mac and cheese. The pâtés were good, the shrimp one I need to remember to add a touch more salt in the process, but all in all it was very tasty. The vegetable one is great especially if you are tired of the same party foods over and over. They were both rather easy to make, though there were many steps involved. ON TO THE NEXT...
The next project I did was a cheese called labneh, or yogurt cheese. I have found a new love. I am not kidding here, I never thought I would be able to find another cheese that I would enjoy as much as all the ones I have already fallen in love with, but the labneh it is amazing. It is a tart, creamy, cheese, almost similar in consistency to cream cheese. The best part about this cheese is how easy it is to make it. You MUST try this, you double fold cheese cloth, add 2.25 lbs of plain greek yogurt and salt, and then you let it sit for 4-8 hours. That is it, nothing real face but once it's done, you get to say you have made cheese. I served this with the same crackers that I used with the pâtés, and it was wonderful. I could see dressing this cheese up a bit though too. So here are the photos.

This is the the cheese sitting and waiting for the greatness it will become.

Here is the final product. I truly feel I could have sat down with this bowl and a spoon and finished it off at once, I would have been sick, but it may have been worth it.
I think out of the three recipes my favorite for sure with the cheese, in fact I will be doing that again this weekend. I cannot wait to start playing with all the possible accompaniments for this cheese. I hope you enjoyed, and keep coming back, there maybe another cooking challenge or two before the next "Official" Challenge is up.
Tuesday, November 4, 2014
Better late than not at all..
So I have realized it has been ages since I have participated in a Daring Kitchen challenge, so for the last Daring Baker's challenge I decided to give it a go. The challenge was for October 2014, with posting to occur prior to November 1, 2014, so since today is the 4th, I am obviously late. The good thing though is that I am here today and am making attempts to get it together again in the blogospher. So here goes the post...
Blog checkin line:
The October Daring Bakers' challenge was brought to us by Korena of Korena in the Kitchen. She took us to Austria and introduced us to the wonders of the Sachertorte.
Now let me start by proper pronunciation, I have mispronounced this my entire life, but that is no surprise to anyone who knows me. I struggle terribly with knowing how to "sound" words out.. So I have always called this sasher-tort when apparently according to the number of videos I watched to just get the feel for the cake it is properly pronounced sacker-tort; and so there you have it the introduction to Sachertorte an Austrian cake that my husband and coworkers loved. I was not fond of it, as well I may have said in the past, I do not care for chocolate that much. The cake however was a fun challenge and was beautiful once it was all put together. I did have a few problems with following the directions; I really need to remember to read all the way through a recipe prior to attempting to finish it.
So what is Sachertorte; well according to good'ol wikipedia it is a chocolate cake that was created and developed by an Austrian by the name of Hanz Sacher in1832, they also share that December 5th is apparently National Sachertorte day. You can find more information from wiki here. What I can tell you about the Sachertorte I made is that it is a chocolaty spongy cake that has a filling of apricot glaze, that I was actually supposed to place all over the cake, however neglected to read that part in the recipe and only placed it in the center of the cake, oops; the cake is then enrobed in a chocolate glaze that is somewhat thinner than ganache. I have to say I am not sure how I was able to get the glaze to turn out so perfectly because my candy thermometer has gone missing and I had to "guess" the right time to add the chocolate to the hot molten water sugar mixture, but it worked out in my favor. The glaze appeared to be the most difficult thing among the other Daring Bakers, but that is a group of bakers that are willing to keep chipping away at it. If you are interested in giving this cake a go I would highly recommend the recipe that was provided by this months hostess Korena, you can find the recipe here.
And now for my mother's favorite part of my blog the photos with commentary!
I was looking through my photos trying to find all the lovely pictures I took of the process while I was mixing and preparing my Sachertorte and was surprised to learn that my photos are gone, I mean not completely gone, I still have the ones that I took on the phone but they are certainly not the better batch; they however will have to do.
The first Perfect slice, this cake required a bit of whipped cream as it is a dryer cake which according to the hostess is common among European cakes. I have to add too, that I had a friend at the house while I was finishing this cake up, she was surprised to see that I was whipping cream.
Prior to removal from the pan the cake sat and cooled, the texture of the top at this point was much like a chocolate meringue, delicious and light as air.
Yes that large-ish missing section of the top was eaten while I was making the glaze.
This is the cake cooling after I added the chocolate glaze, I was really pleased with how well my glaze did, even without my candy thermometer.
My piping skills clearly are about as good as my ability to take non-blurry photos, but I felt it was important to see that I did pipe on the top as was in the challenge.
After the cake had time to set up some I could not resist cutting it, I wanted to know that every thing was in place and that the chocolate glaze was not going to be runny.
And here is the final photo, the perfect little slice with whipped cream to accompany the cake. I wonder had I followed the directions regarding the apricot glaze would it have made much of a difference.
As I have said before many times, there is nothing I enjoy more than experiencing a culture, a country, and travel opportunity by the plate, and here is yet another example of traveling from my own couch. I hope you enjoy. Thanks for taking a look!
Thursday, January 30, 2014
New Cookbook... New recipes to try.
One of my favorite things to receive is a new cookbook. For Christmas 2013 my parents gave me the Dorie Greenspan "Around my French Table." I have wanted this cookbook for a while so I was incredibly excited to get to really spend time looking through it. So while looking through it I decided to start at the front and cook my way through the book, first recipe was grougeres, delicious cheese puffs. I ate so many I think I may have made myself sick.


The cookbook and eggs that have come to room temp.
More ingredients, don't skimp and purchase cheap cheese, get the better stuff!
Okay, I seriously could have eaten this whole bowl.
Waiting for the butter, milk, water, and salt to come to a boil.
This is the dough before the addition of the first egg.
Eggs are being added here, they seem initially as if they would not incorporate, but patience is important here.
The dough is just gorgeous.
Final egg addition, I should tell you this recipe calls for 5 eggs.
This is that wonderful cheese that I added after the dough was complete.
Now it is time to scoop the dough onto the prepared cookie sheets.
I found that using a scooper to scoop helped with consistency in shape and size.
After a round in the oven, they look perfect don't they.
I have to have some shots before they are eaten. They look so crispy and delicate.
Final shot right before these three were eaten.
So, I have a few things I would change with this recipe. The original calls for sharp cheddar or Gruyere which is just a delicious french cheese, as I used cheddar I would add some spice next time by way of cayenne or mustard powder. Another thing to say is that these are rather "eggie" in their taste, which may be the reason hubs was not so fond of them. Things I might use them for in the future, these would be amazing stuffed with a roast beef of some kind, or possibly a breakfast stuffing of some kind. The more I think about stuffing them with a roast beef the more I think about coming up with a roast beef salad of some kind, think tuna or ham salad. Maybe a thin shaved roast beef mixed with a horseradish mayo, certainly something to continue to think about. I could also see these being amazing stuffed with an apply pie filling of some kind, considering they were made with cheddar, a more "upscale" version of apple pie... Anyone?
Anyway, thanks for indulging me yet again on another cooking adventure, I have plans to try more recipes soon out of "Around my French Table," which means more blogs in the future. Thanks for reading.
Subscribe to:
Comments (Atom)